Monday 22 August 2016

ADDING A NEW MULE SERVER INTO MMC ON VIRTUALBOX

Download MMC from https://www.mulesoft.com/dl/mmc

Create four VMs on Oracle VirtualBox.
[ Note to be taken here is that if in case facing any issue while ping between VMs then follow my previous blog on "3 node architecture". The communication between VMs is very important part while setting up servers on MMC ]

VMs, better to have Linux Server Distribution.

Transfer the downloaded MMC zip file to each VMs.

Now go to super user mode and unzip the file.
[ Now onward everything will be in super user mode. ]

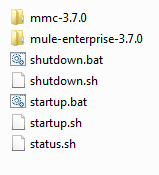
You will see files depicted as below
[ In Linux terminal view will be different. ]


Note to be taken here is to check "truststore.jks" in


$ mule-enterprise-3.7.0/.mule/.agent/


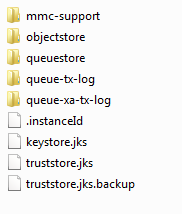
If "truststore.jks" is present just remove it or remove .mule folder.
As soon Mule server is registered on MMC, MMC creates "truststore.jks" on Mule server for secure communication between them.
The above step has to be happened on all four VMs ]

Here in this demonstration out of four, one VM will have MMC & MULE and other VMs will have MULE running on it.

VM with MMC & MULE has to run startup.sh to start both MMC & MULE.
[ "startup.sh" present in parent directory as show in above pic ]

On other VMs to start the MULE, run following command on terminal

$ ./mule-enterprise-3.7.0/bin/mule

Note : - 
  1. Other VMs (Mule server) should have only Mule and not the MMC running on it.
  2. For proper communication between Mule and MMC, put all VM on HOST ONLY adapter
  3. NAT adapter should not be used.

Following snippet shows how it goes --->


Wednesday 9 March 2016

KICK START WITH MULE ESB

What is Payload ?


The term 'payload' is used to distinguish between the 'interesting' information in a chunk of data or similar, and the overhead to support it. It is borrowed from transportation, where it refers to the part of the load that 'pays': for example, a tanker truck may carry 20 tons of oil, but the fully loaded vehicle weighs much more than that - there's the vehicle itself, the driver, fuel, the tank, etc. It costs money to move all these, but the customer only cares about (and pays for) the oil, hence, 'pay-load'.

In programming, the most common usage of the term is in the context of message protocols, to differentiate the protocol overhead from the actual data. Take, for example, a JSON web service response that might look like this (formatted for readability):
{
    "status":"OK",
    "data":
        {
            "message":"Hello, world!"
        }
}

In this example, the string Hello, word! is the payload, the part that the recipient is interested in; the rest, while vital information, is protocol overhead.

Another notable use of the term is in malware. Malicious software usually has two objectives: spreading itself, and performing some kind of modification on the target system (delete files, compromise system security, call home, etc.). The spreading part is the overhead, while the code that does the actual evil-doing is the payload.

Sunday 28 February 2016

HOW TO SETUP SYNTAX HIGHLIGHTER FOR BLOGGER

There are a lot of stuff is available for syntax highlighter on google but this one I find better suited for my requirement so feels like sharing with you.

You can get reference here...

When you get logged in in your blogger account follow this step.

Template ----> Edit HTML

Inside the HTML code just before </b:skin> tag paste the following CSS code.

.code { 
background:#f5f8fa; 
background-image:none; 
background-repeat:no-repeat; 
border: solid #5C7B90; 
border-width: 1px 1px 1px 20px; 
color: #000000; 
font: 13px 'Courier New', Courier, monospace; 
line-height: 16px;
margin: 10px 0 10px 10px; 
max-height: 200px; 
min-height: 16px; 
width: 00px
overflow: scroll; 
padding: 28px 10px 10px; width: 90%; 
} 
.code: hover { 
background: #FAFAFA; background-image:none; 
background-repeat:no-repeat; 
}

You can also change the above properties according to your requirement.
How to use this class...?
<pre class="code">  
   //code goes here
</pre>


To use other highlighter paste the following scripts in your Template right before the end of <head>...
<!-- REQUIRED JAVASCRIPT LIBRARIES --> 
<link href='http://alexgorbatchev.com/pub/sh/2.1.382/styles/shCore.css' rel='stylesheet' type='text/css'/> 
<link href='http://alexgorbatchev.com/pub/sh/2.1.382/styles/shThemeDefault.css' rel='stylesheet' type='text/css'/> 
<script src='http://alexgorbatchev.com/pub/sh/2.1.382/scripts/shCore.js' type='text/javascript'/> 
<script src='http://alexgorbatchev.com/pub/sh/2.1.382/scripts/shBrushCpp.js' type='text/javascript'/> 
<script src='http://alexgorbatchev.com/pub/sh/2.1.382/scripts/shBrushCSharp.js' type='text/javascript'/> 
<script src='http://alexgorbatchev.com/pub/sh/2.1.382/scripts/shBrushCss.js' type='text/javascript'/> 
<script src='http://alexgorbatchev.com/pub/sh/2.1.382/scripts/shBrushJScript.js' type='text/javascript'/> 
<script src='http://alexgorbatchev.com/pub/sh/2.1.382/scripts/shBrushPhp.js' type='text/javascript'/> 
<script src='http://alexgorbatchev.com/pub/sh/2.1.382/scripts/shBrushPython.js' type='text/javascript'/> 
<script src='http://alexgorbatchev.com/pub/sh/2.1.382/scripts/shBrushRuby.js' type='text/javascript'/> 
<script src='http://alexgorbatchev.com/pub/sh/2.1.382/scripts/shBrushSql.js' type='text/javascript'/> 
<script src='http://alexgorbatchev.com/pub/sh/2.1.382/scripts/shBrushVb.js' type='text/javascript'/> 
<script src='http://alexgorbatchev.com/pub/sh/2.1.382/scripts/shBrushXml.js' type='text/javascript'/> 
<script src='http://alexgorbatchev.com/pub/sh/2.1.382/scripts/shBrushPerl.js' type='text/javascript'/> 
<script language='javascript'>
  SyntaxHighlighter.config.bloggerMode = true; 
  SyntaxHighlighter.config.clipboardSwf = 'http://alexgorbatchev.com/pub/sh/2.1.382/scripts/clipboard.swf'; 
  SyntaxHighlighter.all(); 
</script>


Here is code to show this highlighter...